

In the world of software development, build tools are an integral part of the development process. They undertake the important task of converting source code into executable programs or libraries, and play a key role in automated builds, dependency management, and continuous integration. Among many build tools, Gradle has become the officially recommended Android project build tool due to its powerful functions and flexible features.
1. Introduction to Gradle
Gradle is a build automation tool based on the concepts of Apache Ant and Apache Maven, but it is more flexible and powerful. Compared with traditional XML configuration, Gradle uses Groovy or Kotlin DSL (domain-specific language) to write build scripts, making the build logic more intuitive and easier to understand. Gradle supports multi-project building, dependency management, incremental building and other functions, and has good scalability, and its functions can be easily extended through the plug-in mechanism.
2. Gradle life cycle
The Gradle build process can be divided into three stages:
- Initialization
- Configuration
- Execution
In the initialization phase, Gradle prepares the execution environment; in the configuration phase, Gradle configures the project structure, tasks, and dependencies; in the execution phase, Gradle executes the tasks defined in the project and completes the build process.
2.1 Gradle initialization phase (Initialization)
The Gradle initialization phase is the first step in the build process and is responsible for preparing the execution environment. During the initialization phase, Gradle will execute the gradle file in the folder ( C:\Users\%USERNAME%\.gradle\) in the user directory ( the folder does not exist by default and needs to be created manually). Multiple gradle files can be placed in this folder, and these files will be executed in alphabetical order at this stage.init.d\init.d\
For example, you can init.d\create a file in a folder init.gradlewith the following content:
println("gradle version: ${getGradleVersion()}")

ext.timestamp = {
    new Date()
}
getGradleVersion()It is a function in the Gradle interface. For the complete method of Gradle, see: docs.gradle.org/current/jav…
Every time the project is executed, the current gradle version will be printed out, for example: , and a timestamp global attribute will be created, which can be read gradle version: 8.2in the project through .gradle.timestamp()
//  timestamp: Thu Apr 18 16:06:46 CST 2024
println("timestamp: ${gradle.timestamp()}")
The initialization phase can be used to implement some global configuration and initialization operations.
When building a multi-project, (Multi-Project Build), the initialization phase will also parse the content in settings.gradle. This file is used to define the structure of the project (including sub-projects), as well as some global configurations.
Project settings.gradle sample code:
//
include 'subproject1', 'subproject2'
//
include ':subproject_in_other_folder'
//
project(':subproject_in_other_folder').projectDir = file('<path_of_the_folder_contains_the_subproject>')

//
rootProject.name = "MyProject"
//
rootProject.buildFileName = "myCustomName.gradle"
include(), getRootProject() are functions in the Settings interface. For the complete methods and properties of Settings, see: docs.gradle.org/current/jav…
2.2 Gradle configuration phase (Configuration)
The Gradle configuration phase is the core of the build process and is responsible for defining and configuring the various tasks of the project. During the configuration phase, Gradle will gradually parse and configure the tasks and dependencies in the project according to the build script. Through the rich functions provided by DSL ( Domain-Specific Language , domain-specific language), developers can flexibly define tasks, manage dependencies and configure the build process to prepare for the subsequent execution phase.
Project’s build.gradle sample code:
//
repositories {
    mavenCentral()
}

//
dependencies {
    implementation 'org.apache.commons:commons-math3:3.6.1'
}
repositories(), dependencies(), getTasks() are functions in the Project interface. For the complete methods and properties of Project, please see: docs.gradle.org/current/jav…
2.2.1 Proxy mode in Gradle
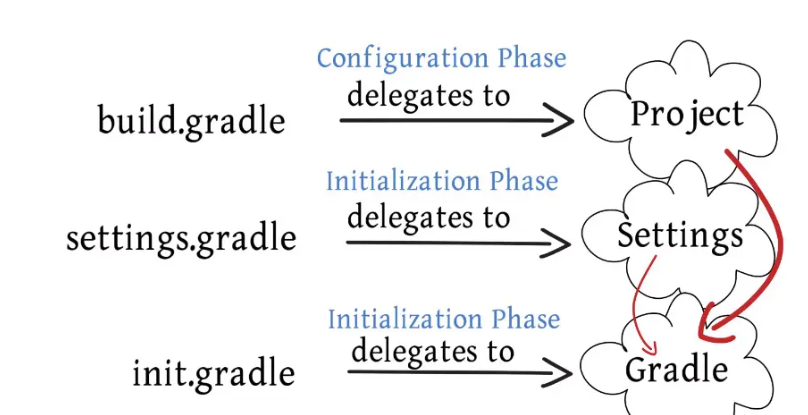
- All gradle files implement the Gradle interface. In a general gradle file, the context is the proxy object of Gradle, and you can use the methods in the Gradle interface.
- build.gradle additionally implements the Project interface. In the build.gradle file, the context is the proxy object of Project, and you can use the methods in the Project interface. The Gradle proxy object can be obtained through project.gradle.
- settings.gradle additionally implements the Settings interface. In the settings.gradle file, the context is the proxy object of Settings, and you can use the methods in the Settings interface. The Gradle proxy object can be obtained through settings.gradle.
2.2.2 Properties in Gradle
Gradle supports defining key-valueattributes, which can be placed gradle.propertiesin the project’s file, or gradleUserHomeDirin gradle.propertiesa file, or -Pkey=valuepassed in through the command line.
Before using attributes, it is better to use hasProperty()a function to check, which is safer.
2.2.3 Tasks and Actions
The configuration phase of gradle is used to define and configure various tasks in the project. The execution phase is used to actually execute these tasks. A project consists of 0 or more tasks, and a task consists of 0 or more actions.
There are two very convenient methods doFirst and doLast in task. These two methods can be used to add actions to the specified task.
//  task
tasks.register('customTask') {
    doFirst {
        println 'Before customTask'
    }
    doLast {
        println 'After customTask'
    }
}
For all methods of Task, see: docs.gradle.org/current/jav…
When there are multiple doFirsts, the one added last will be executed first. When there are multiple doLasts, the one added last will be executed last. In other words, the action added by doFirst is added to the front of all actions, and the action added by doLast is added to the end of all actions, just as the name suggests.
The task execution order can be set through dependsOn:
// Task
clean.doFirst {
    println 'Start to clean'
}

//
clean.dependsOn(customTask)
Execute clean, the output is as follows:
Before customTask
After customTask
Start to clean
2.2.4 TaskGraph
After defining the Task and setting the dependencies in the Configuration phase. Before the submission phase, a TaskGraph will be generated, which is the topology graph of all Tasks that need to be executed during the submission phase. project.gradle.taskGraph.getAllTasks()All Tasks in TaskGraph can be obtained through
project.gradle.taskGraph.whenReady {
    it.getAllTasks().each {
        println("Task: $it")
    }
}
Execute clean once, the output is as follows:
Task: task ':customTask'
Task: task ':clean'
TaskGraph is a directed acyclic graph, through which getDependencies()you can obtain the dependency relationship of a certain Task:
project.gradle.taskGraph.whenReady {
    it.getDependencies(clean).each {
        println("Task: $it")
    }
}
Execute clean once, the output is as follows:
Task: task ':customTask'
getAllTasks() and getDependencies() are both methods in the TaskExecutionGraph interface. For all methods of TaskExecutionGraph, see: docs.gradle.org/current/jav…
TaskExecutionGraph also has a commonly used method hasTask()for determining whether a task is in the graph. The received parameter can be the task name, or the task itself.
2.2.5 Using plug-ins
In the plug-in, you can modify the configuration, add tasks, add actions, etc. It is equivalent to encapsulating certain operations in the configuration phase for better reuse.
Taking the use of java plug-ins as an example, adding plug-ins can be written as:
plugins {
    id 'java'
}
or:
apply plugin: 'java'
After using the java plug-in, the integrated tasks are introduced into the project, such as the javadoc task for generating java documents and the jar task for packaging jar files.
You can modify the configuration of these tasks, such as modifying the jar file name:
jar {
    baseName = "customName"
}
After Apply java plugin, see the added tasks: docs.gradle.org/current/use…
You can also customize plug-ins to encapsulate tasks and configurations that are relatively independent and reusable in the project. This topic can be written as a separate article. Here are two well-written articles recommended:
- In-depth exploration of Gradle automated build technology (4. Customized Gradle plug-in)
- Gradle foundation building (5)-Gradle custom plug-in practice
2.2.6 Dependency management and transitive dependencies (Transitive Dependencies)
Gradle provides a powerful dependency management mechanism, supporting direct dependencies (Direct Dependencies) and transitive dependencies (Transitive Dependencies). Gradle also supports excluding specific transitive dependencies to resolve version conflicts and dependency conflicts.
Introduce dependent library warehouse:
repositories {
    mavenCentral()
}
The proxy mode is also used here. Before entering the repository block, the current delegate object is project, and methods in the Project interface can be called. After entering, the current delegate object becomes the proxy object provided by the repository, which is equivalent to switching the Context. You can directly call methods in the repository, for example mavenCentral().
Therefore, introducing a dependent library warehouse can also be written as:
project.repositories {
    repositories.mavenCentral()
}
or:
delegate.repositories {
    delegate.mavenCentral()
}
mavenCentral()What is the address of the imported dependent library warehouse? Looking at repository {}the introduction in the Project interface document, we can find that in its context, the proxy object provided is RepositoryHandler. Check the documentation of RepositoryHandler to find mavenCentral()the actual URL represented: repo.maven.apache.org/maven2/
MVN Repository address: mvnrepository.com/ , you can check which repositories are in mavenCentral() and how to add dependencies on this website.
Likewise, the actual URL represented by google() can be found: dl.google.com/dl/android/…
But it seems that Google does not provide a webpage to display all its libraries. If any readers find it, I hope you can enlighten me.
Adding a dependent library repository is only the first step in adding dependencies. dependencies {}The actual adding of dependent libraries is through .
The proxy object of dependencies can be found in the same way as DependencyHandler: docs.gradle.org/current/dsl… , where you can find
dependencies {}the functions that can be called in the code block.
Note: The implementation function is in Gradle Java Plugin , and the api function is in Gradle Java Library Plugin .
Take mvnrepository.com/artifact/or… as an example to introduce the complete writing method of dependent libraries:
implementation group: 'org.apache.commons', name: 'commons-math3', version: '3.6.1'
Simple writing:
implementation 'org.apache.commons:commons-math3:3.6.1'
Dependencies can be divided into Direct Dependencies and Transitive Dependencies according to the reference method. Direct Dependencies refer to dependencies declared directly in the project, and Transitive Dependencies refer to dependencies brought over from Direct Dependencies.
Check the dependencies under the app module:
gradlew app:dependencies
If there are many dependencies and it is inconvenient to view them on the console, you can output them to a file:
gradlew app:dependencies >dependencies.txt
You can also use the project-report plug-in to generate a report and add the plug-in:
apply plugin: 'project-report'
Execute task:
gradlew htmlDependencyReport
After execution, a report will be generated in the app/build/reports/ directory. Click app/build/reports/project/dependencies/index.htmlto view the dependency report:
Among them, implementationDirect dependencies are included in RuntimeClassPath, and Direct dependencies and Transitive dependencies are included in RuntimeClassPath.
Gradle project-report plugin doc: docs.gradle.org/current/use…
Example code to exclude certain Transitive Dependencies:
implementation('commons-beanutils:commons-beanutils:1.9.4') {
    exclude group: 'commons-collections', module: 'commons-collections'
}
2.2.7 Multi-Project Build
Multi-Project consists of Root Project and multiple dependent Sub Projects. Sub Projects can also continue to depend on other Sub Projects, and Sub Projects can also depend on each other.
When the Root project executes clean or build, all Sub Projects will also execute clean and build.
Root project needs to have a settings.gradle file. This file is optional when building Single project, but it is required for Multi-Project Build. This file is used to mark which subprojects this project contains, and can also be used to set properties common to all subprojects.
In the build.gradle file of rootProject, you can set properties common to subprojects:
subprojects {
    apply plugin: 'java'
    group = 'com.mygroup'
    version = '0.1'

    sourceCompatibility = 1.8
    targetCompatibility = 1.8

    repositories {
        mavenCentral()
    }
}
In addition to the subprojects method, there is also an allProjects method, including Root Project and Sub Projects:
allprojects {
    println("$it")
    println("$it.name")
    println("$it.path")
}
Sub Projects can also be accessed through rootProject.childProjects:
rootProject.childProjects.each {
    println("$it")
    println("$it.key, $it.value, $it.value.name")
}
project(path)A single Project can be obtained through :
project(':') {
    println("$it")
    println("$it.name")
}

project(':app') {
    println("$it")
    println("$it.name")
}
Adding a project as a dependency is similar to this:
dependencies {
    implementation project(':lib')
}
If you want to include transitive dependencies, you need to replace implementation with api. The api scope is in the java-library plugin. This is easy to understand because the application is independent and will not be reused, while the java-library can be reused:
apply plugin: 'java-library'
dependencies {
    api 'org.apache.commons:commons-math3:3.6.1'
}
2.3 Gradle execution phase (Execution)
The Gradle execution phase is the final step in the build process and is responsible for actually executing the tasks defined in the project. During the execution phase, Gradle will execute tasks one by one according to the dependencies between tasks and complete the build process. The execution phase usually involves specific operations such as compilation, packaging, testing, and deployment. Gradle will automatically perform these tasks based on the project’s configuration and requirements. Through the execution phase, developers can compile the project from source code to the final executable product, achieving automated build and continuous integration.
Gradle is an incremental build system. If a task has not changed, it will output UP-TO-DATE and skip execution, which can make the build faster.
Take the compile task as an example. Its input is source code and its output is class files. If the source code has not changed during this build compared to the last build, and the output has not been deleted, then the compile task will be skipped during this build. In short, if input and output have not changed, output UP-TO-DATE and skip this task.
The clean task is used to delete the build folder. If clean is executed and then compile is executed, because the output is deleted, compile will be executed again.
3. Others
3.1 Kotlin DSL
Gradle supports the use of the Kotlin language. When using the Kotlin DSL, the file names are different:
- settings.gradle -> settings.gradle.kts
- build.gradle -> build.gradle.kts
The language used has also been changed from groovy to kotlin.
3.2 gradle wrapper
The function of gradle wrapper is to provide an offline gradle program, so that a project can be run on the computer without installing gradle. And it can avoid the problem of version inconsistency.
There is a wrapper task in the project, which is used to generate gradle-wrapper, in which gradleVersion can be configured:
wrapper {
    gradleVersion = '8.2'
}
Use gradle wrapper to execute clean + build sample code:
gradlew clean build