
Introduction to Camunda
Camunda is a flexible workflow and process automation framework. At its core is a native BPMN 2.0 process engine running inside the Java virtual machine. It can be embedded into any Java application and any runtime container.
- Official website: www.camunda.org/
- Getting started documentation: docs.camunda.org/get-started…
Hands-on integration with Camunda
Let’s try it step by step below.
Preparation
- Use the project initialization tool Camunda Automation Platform 7 Initializr provided by Camunda
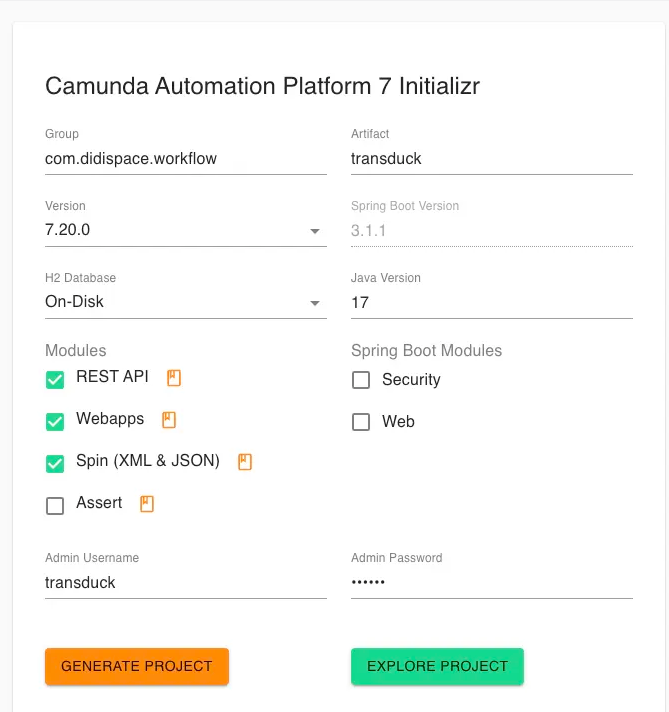
As shown in the picture above, configure the package name and so on according to your needs. Finally, enter the management account and password, click Generate Projectthe button, and automatically download the project.
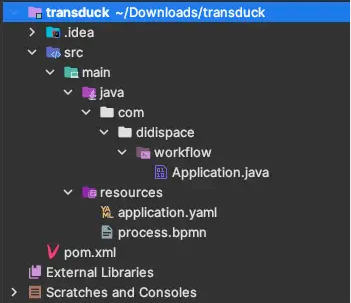
- Unzip the downloaded project and open it with IntelliJ IDEA . Its project structure
- Open
pom.xmlthe file and add camunda dependency:
<dependency>
    <groupId>org.camunda.connect</groupId>
    <artifactId>camunda-connect-core</artifactId>
</dependency>

<dependency>
    <groupId>org.camunda.bpm</groupId>
    <artifactId>camunda-engine-plugin-connect</artifactId>
</dependency>
Since the default Spring Boot version of Camunda Automation Platform 7 Initializr is already 3.1, if you want to make some downgrade adjustments, you can manually modify pom.xmlthe dependencyManagementconfiguration, such as the following:
<dependencyManagement>
    <dependencies>
      <dependency>
        <groupId>org.springframework.boot</groupId>
        <artifactId>spring-boot-dependencies</artifactId>
        <version>2.6.4</version>
        <type>pom</type>
        <scope>import</scope>
      </dependency>

      <dependency>
        <groupId>org.camunda.bpm</groupId>
        <artifactId>camunda-bom</artifactId>
        <version>7.15.0</version>
        <scope>import</scope>
        <type>pom</type>
      </dependency>
    </dependencies>
</dependencyManagement>
- Open the configuration file
application.yamland you will see something similar to the following
spring.datasource.url: jdbc:h2:file:./camunda-h2-database

camunda.bpm.admin-user:
  id: transduck
  password: 111111
spring.datasource.url: The database configuration used by the workflow engine can also be adjusted to other databases (especially production environments) according to the official website documentation.camunda.bpm.admin-user: Administrator account configuration, you can modify the user name and password here
Create a simple workflow
Below we try to create a simple workflow:
In the first step, we will ask the user for two inputs: name and message. In the second step, we will pass these inputs to our service to create the message output.
Start coding:
- Create the data model mentioned in the first step
public class model {

    private String message;
    private String name;

    public model() { }

    public String getMessage() {
        return message;
    }

    public void setMessage(String message) {
        this.message = message;
    }

    public String getName() {
        return name;
    }

    public void setName(String name) {
        this.name = name;
    }

    @Override
    public String toString() {
        return "" + message + ", " + name;
    }
}
- According to the second step, create an interface for receiving messages
@RequestMapping("/")
@RestController
public class controller {

    Logger logger = Logger.getLogger(this.getClass().getName());

    @PostMapping("/message")
    public model createMessage(@RequestBody model model) {
        logger.info("-------Message Creator Initialized-------");

        model m = new model();
        m.setMessage(model.getMessage());
        m.setName(model.getName());

        logger.info("Message created --> " + m.toString());
        return m;
    }
}
- Next we can start creating the workflow diagram. Open our project in Camunda Modeler , we will see a flow chart similar to the following:
resourcesprocess.bpmn
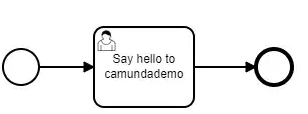
The boxes with the little people in the figure are called User Taskssteps that perform user-related operations. As mentioned in the previous section, in the first step of the workflow we will ask the user for two inputs: name and message. No need to add new tasks, updating existing ones User Taskswill solve the problem. Click User Tasksto open the properties panel, and define the content suitable for our case in the opened panel.
- After completing filling in the basic information, go to
Formthe tab.
This defines the form tabs presented to the user. Since we need the user to enter a name and message, we define two form fields called “name” and “message”. To define a form field, click the plus icon next to “Form Fields.” In the form that opens, fill in the ID, Type and Tag fields accordingly. Repeat the same steps for each form field.
- Start the second step of configuration and call our interface. Add to
Service Task.
How to do it: Click the icon in the left menu Create Task, then drag and drop the task to a random location. After clicking on the task, click on Change Typethe icon and select from the menu Service Task.
- Fill in basic information
- Switch to
Connectortab. This is the tab that defines HTTP information and data about the service. Configure the interface just defined here, as shown in the following figure:

- Will
Service Taskbe connected into the workflow. Start by removing the arrow betweenUser Tasksand .End EventThen, clickUser Tasksand select the arrow icon from the menu. Connect the arrow toService Task. Finally, connectService TaskandEnd Event.
Start testing
After completing the above coding and workflow configuration, we can run the project in debug mode.
After the startup is complete, visit the address on your browser http://localhost:8080/and you will see the Camunda login page:
Enter application.yamlthe administrator configuration information you configured in and enter the background:
Select from the application homepage Tasklistand you will see the following interface:
Add a simple filterThen click Options on the task list page . Once clicked, you will see that All Tasks (0)the filter named has been added to the list, continue clicking on Start processthe option to run our prepared workflow.
Select your workflow process and click Start buttonwithout providing any other information.
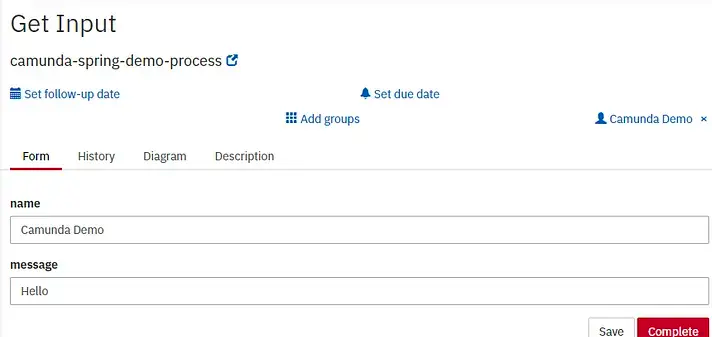
Finally, click on the task Createdlisted below Get Input. If you don’t see the task, refresh the page.
You will see the form we defined in the first step. To fill out the form, click on Claimthe option in the upper right corner. Then, fill out the form according to your preferences and click Completethe button.
When the workflow executes Service Taskand the service runs, you will see the list become empty again. If the workflow successfully executes the second step, we should be able to see the output in the console.
summary
This article introduces the complete steps to create a simple workflow using Spring Boot and Camunda. I hope it will be helpful to you. What if you encounter difficulties while studying? You can join our super-high-quality Spring technology exchange group to participate in exchanges and discussions for better learning and progress! For more Spring Boot tutorials, click here! , welcome to collect and forward for support!