

1 App Thinning
App thinning is a technique for optimizing mobile applications to reduce their installation package size and improve performance. It is a method developed by Apple for iOS applications in order to make the application more suitable for various different types of iOS devices.
App Thinning mainly includes technologies:
- Slicing (iOS, tvOS)
- Bitcode
- On-Demand Resources (iOS, tvOS)
1.1 Slicing
Slice Apps are supported on iOS 9.0 and higher devices.
Slicing is the process of creating and delivering app bundle variations for different target devices and operating system versions. When a user installs an app, the system downloads and installs variations of the user’s device and operating system version.
Xcode simulates slicing during development. When you build and run the app on a device or simulator, Xcode slices the app. When you create an archive, Xcode includes the full version of the app, but allows you to export variants from the archive.
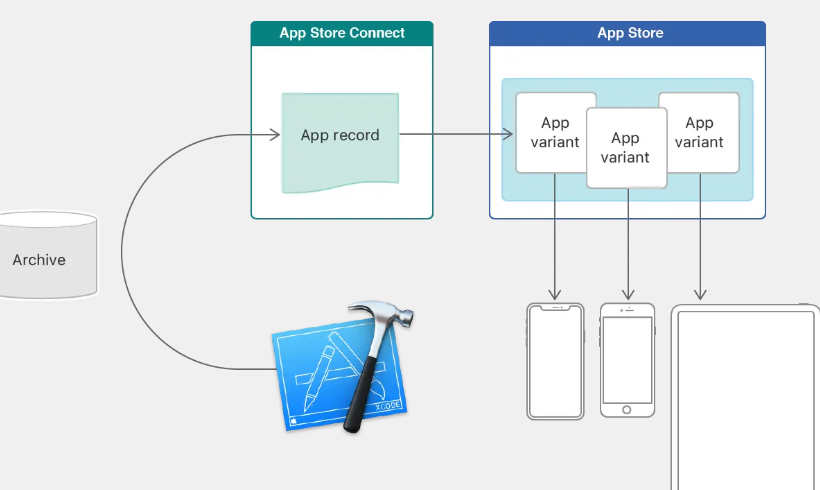
work process:
- In Xcode, specify the target device and use Asset Catalogs to provide images in multiple resolutions. Only by using Asset Catalogs can Slicing be applied to resource files correctly.
- Compile and run on the simulator or real device. Xcode automatically builds “variant apps” for the running device, reducing compilation time and supporting local testing of different variants.
- Archieve, export a variant locally for the target device. Multiple “variant apps” can be exported locally to test and fix configuration errors.
- Upload to App Store Connect. The App Store creates “Variant Apps” based on the uploaded .ipa archive file. The number of “Variant Apps” depends on the architecture and resources configured in the Xcode project.
- Upload to publish a preview version in App Store Connect for testing. Download the preview version through TestFlight, and TestFlight downloads the appropriate “variant app” for the target device.
- Publish the App. App Store Download the appropriate “variant App” for the user’s device
1.2 Bitcode
Bitcode is an intermediate representation of a compiled program. Apps uploaded to App Store Connect that contain bitcode will be recompiled and linked on the App Store.
In the future, if Apple launches a new CPU architecture or LLVM launches a series of optimizations, the Apple Store will automatically re-optimize the application binary file without having to submit a new version to the App Store again.
Enable steps: Build Settings -> Enable Bitcode -> YES
Notes on enabling Bitcode:
- The static libraries, dynamic libraries, and third-party libraries managed by Cocoapods that the App depends on all need to enable Bitcode.
- The final generated executable file is automatically generated by Apple, and new symbol table files (dSYMs) are generated, which require symbol remapping to ensure correct parsing of crash logs and debugging information.
1.3 On-Demand Resources
On-Demand Resources (ODR)
The App Store hosts some of its resources on Apple servers and manages downloads for you. The App Store also slices on-demand resources to further optimize App variants.
Precautions:
- When a user enters a certain business, on-demand resources are downloaded in the background as needed.
- When on-demand resources are no longer needed and disk space is low, the operating system clears them.
Load configuration & request resources on demand
Use the on-demand loading feature:
1. Enable steps: Build Settings -> Enable On-Demand Resources -> YES
2. Select the Resources Tag -> Download Only On Demand -> add “+” and name the resource tag
Resources Tag Introduction:
- Initial install tags: Initial installation tags. Resources will be downloaded as the App is downloaded from the App Store, which will affect the size of the ipa
- Prefetch tag order: Prefetch tag order. After the App is downloaded, the corresponding resources will start to be downloaded. Such resources will not affect the size of the ipa. Suitable for game scenarios
- Dowloaded only on demand: Downloaded only on demand. Resources will actively trigger downloads when necessary, and developers control the download timing.
3. Download on-demand resources
- (void)onDemandDownload {

    //
    NSArray<NSString *> *tags = @[ @"ImageAssets" ];
    NSBundleResourceRequest *request = [[NSBundleResourceRequest alloc] initWithTags:tags];

    //
    [request beginAccessingResourcesWithCompletionHandler:^(NSError * _Nullable error) {
        if (error) {
            //
            [self handleResourceRequestError:error];
            return;
        }

        //
        dispatch_async(dispatch_get_main_queue(), ^{
            //
            //
            NSBundle *bundle = request.bundle;
            UIImage *image = [UIImage imageNamed:@"exampleImage" inBundle:bundle compatibleWithTraitCollection:nil];
            self.imageView.image = image;

            //
            [request endAccessingResources];
        });
    }];
}

- (void)handleResourceRequestError:(NSError *)error {
    if (error.code == NSBundleOnDemandResourceOutOfSpaceError) {
        //
        UIAlertController *alertController = [UIAlertController alertControllerWithTitle:@"Error"
                                                                                 message:@"Insufficient space on device. Please clear some space and try again."
                                                                          preferredStyle:UIAlertControllerStyleAlert];
        [alertController addAction:[UIAlertAction actionWithTitle:@"OK" style:UIAlertActionStyleDefault handler:nil]];
        [self presentViewController:alertController animated:YES completion:nil];
    } else if (error.code == NSBundleOnDemandResourceExceededMaximumSizeError) {
        //
        UIAlertController *alertController = [UIAlertController alertControllerWithTitle:@"Error"
                                                                                 message:@"Resource exceeds maximum memory limit. Please remove some resources and try again."
                                                                          preferredStyle:UIAlertControllerStyleAlert];
        [alertController addAction:[UIAlertAction actionWithTitle:@"OK" style:UIAlertActionStyleDefault handler:nil]];
        [self presentViewController:alertController animated:YES completion:nil];
    } else if (error.code == NSBundleOnDemandResourceInvalidTagError) {
        //
        NSLog(@"Invalid resource tag: %@", error.localizedDescription);
        //
    }
}

@end