As an iOS developer, the platform has some exciting features and capabilities worth exploring. Among them, widgets are my favorite. Widgets have become an integral part of the iOS and macOS experience, and with the latest features introduced in SwiftUI, they are now even more powerful. In this article, we’ll explore how to bring widgets to life through interactivity and animation, making them more engaging and visually appealing. We’ll dive into the details of how animations work with widgets, and showcase the new Xcode Preview API, which enables rapid iteration and customization. Additionally, we’ll explore how to add interactivity to widgets using familiar controls like Buttons and Toggles, and take advantage of the power of App Intents. So let’s get started!
Interactive widgets within widgets are rendered in a separate process, and their view code only runs during archiving. To make widgets interactive, we can use controls such as Button and Toggle. However, since SwiftUI does not perform closures or change bindings in the application’s process space, we need a way to express the actions that can be performed by the widget extension. App Intents provide a solution for this, allowing us to define actions that can be called by the system. By importing SwiftUI and AppIntents, we can use Button and Toggle initializers that accept AppIntent as a parameter to perform the required actions.
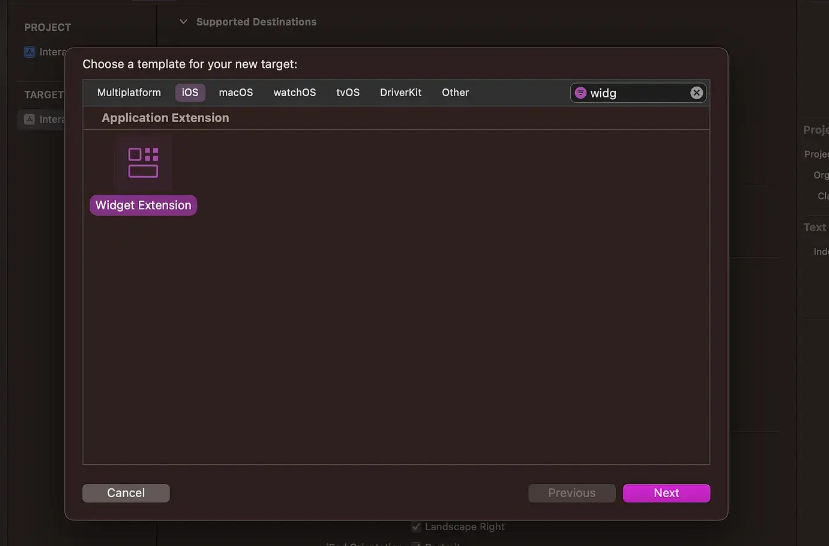
Now we are going to create a widget for our existing project.
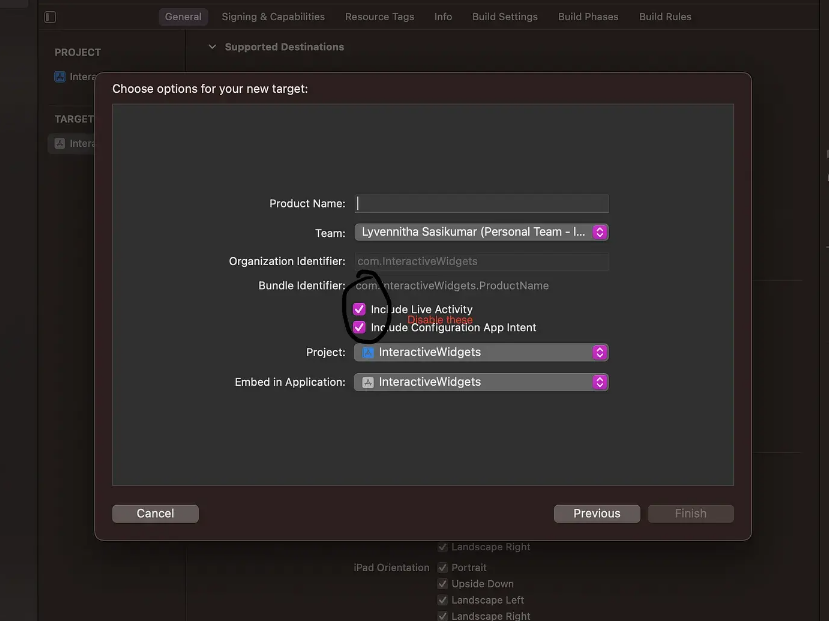
Name it accordingly. Note that both checkboxes are disabled
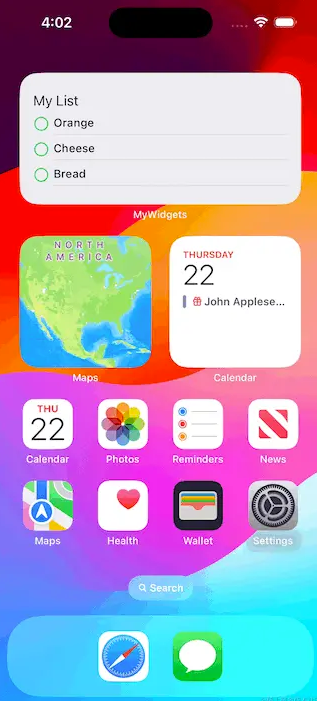
Now I will rewrite the existing code using lists and buttons.
struct Provider: TimelineProvider {
    func placeholder(in context: Context) -> SimpleEntry {
        SimpleEntry( checkList: Array(ModelData.shared.items.prefix(3)))
    }

    func getSnapshot(in context: Context, completion: @escaping (SimpleEntry) -> ()) {
        let entry = SimpleEntry(checkList: Array(ModelData.shared.items.prefix(3)))
        completion(entry)
    }

    func getTimeline(in context: Context, completion: @escaping (Timeline<Entry>) -> ()) {
        //var entries: [SimpleEntry] = []

        // Generate a timeline consisting of five entries an hour apart, starting from the current date.
        let data = Array(ModelData.shared.items.prefix(3))
        let entries = [SimpleEntry(checkList: data)]

        let timeline = Timeline(entries: entries, policy: .atEnd)
        completion(timeline)
    }
}

struct SimpleEntry: TimelineEntry {
    var date: Date = .now

    var checkList: [ProvisionModel]
}

struct InteractiveWidgetEntryView : View {
    var entry: Provider.Entry

    var body: some View {
        VStack(alignment: .leading, spacing: 5.0) {
            Text("My List")
            if entry.checkList.isEmpty{
                Text("You've bought all🏆")
            }else{
                ForEach(entry.checkList) { item in
                    HStack(spacing: 5.0){

                        Image(systemName: item.isAdded ? "checkmark.circle.fill":"circle")
                        .foregroundColor(.green)


                        VStack(alignment: .leading, spacing: 5){
                            Text(item.itemName)
                            .textScale(.secondary)
                            .lineLimit(1)
                            Divider()
                        }
                    }
                }
            }
        }
        .containerBackground(.fill.tertiary, for: .widget)
    }
}

struct InteractiveWidget: Widget {
let kind: String = "InteractiveWidget"

var body: some WidgetConfiguration {
    StaticConfiguration(kind: kind, provider: Provider()) { entry in
            InteractiveWidgetEntryView(entry: entry)
        }
        .configurationDisplayName("My Widget")
        .description("This is an example widget.")
    }
}
The code provided uses SwiftUI to define widgets in an iOS or macOS application. Let’s break down the code and explain each part:
- Provider: This structure conforms to the TimelineProvider protocol and is responsible for providing data to the widget. It contains three functions:
- placeholder(in:): This function returns a placeholder entry representing how the widget will look when it is first added. It creates a SimpleEntry using an inventory array derived from ModelData.shared.items.
- getSnapshot(in:completion:): This function generates a snapshot entry that represents the current state of the widget. It creates a SimpleEntry using an inventory array derived from ModelData.shared.items.
- getTimeline(in:completion:): This function generates the widget’s entry timeline. It creates an array of SimpleEntry instances using an inventory array derived from ModelData.shared.items and returns a timeline containing these entries.
- SimpleEntry: This structure conforms to the TimelineEntry protocol and represents a single entry in the widget’s timeline. It contains a date property representing the date of the entry and a checkList property, which is an array of ProvisionModel items.
- InteractiveWidgetEntryView: This structure defines the view hierarchy used to display widget entries. It takes an entry of type Provider.Entry as input. Inside the body property, it creates a VStack with alignment and spacing settings. It displays a title and, depending on whether the checkList array is empty, displays a message or iterates through the array to display information for each item.
- InteractiveWidget: This structure defines the widget itself. It conforms to the Widget protocol and specifies the type of Widget. It provides a StaticConfiguration that contains a Provider instance as the data provider and an InteractiveWidgetEntryView as the view for each entry. It also sets the widget’s display name and description.
- Preview: This code block is used to preview what the widget will look like during development. It creates previews for .systemSmall sized widgets and provides SimpleEntry instances as entries. Overall, this code sets up a widget that uses the SwiftUI framework to display a manifest. The widget’s data is provided by the Provider structure, and the entry’s view is defined by the InteractiveWidgetEntryView structure. The InteractiveWidget structure configures the widget and provides a preview for development purposes.
And button actions!
Apple introduced AppIntents for this purpose!
I have created view model and application intent.
struct ProvisionModel: Identifiable{
    var id: String = UUID().uuidString
    var itemName: String
    var isAdded: Bool = false

}

class ModelData{
    static let shared = ModelData()

    var items: [ProvisionModel] = [.init(
    itemName: "Orange"
    ), .init(
    itemName: "Cheese"
    ), .init(
    itemName: "Bread"
    ), .init(
    itemName: "Rice"
    ), .init(
    itemName: "Sugar"
    ), .init(
    itemName: "Oil"
    ), .init(
    itemName: "Chocolate"
    ), .init(
    itemName: "Corn"
    )]
}
The provided code includes the definition of two data structures: ProvisionModel and ModelData. Here’s an explanation of each item:
ProvisionModel: This structure represents a provision item in the inventory. It complies with the Identifiable Protocol, which requires it to have a unique identifier. It has the following properties:
id: A string attribute that holds a unique identifier generated using a UUID. Each ProvisionModel instance will have a different id.
itemName: A string attribute representing the name of the supply item.
isAdded: A Boolean property indicating whether the item has been added to the inventory. It is initialized with the default value false.
ModelData: This class acts as a data store and singleton, providing shared access to the offering. It has the following components: Shared: Static property of type ModelData that represents a shared instance of the class. It follows the singleton pattern, allowing access to the same instance across applications.
items: An array property containing ProvisionModel instances representing provision items. The array is initialized with a predefined set of items, each with a specific itemName. ModelData.shared instances provide access to this array. Overall, this code sets up the data model for the manifest application. The ProvisionModel structure defines the properties of each provision, including its unique identifier and whether it has been added to the inventory. The ModelData class provides shared access to the list of supplies and follows the singleton pattern to ensure consistency in accessing and modifying the data.
It’s time for appIntent!
struct MyActionIntent: AppIntent{

    static var title: LocalizedStringResource = "Toggle Task State"
    @Parameter(title: "Task ID")
    var id: String
    init(){

    }

    init(id: String){
    self.id = id
}

func perform() async throws -> some IntentResult {
    if let index = ModelData.shared.items.firstIndex(where: { $0.id == id }) {
        ModelData.shared.items[index].isAdded.toggle()

        let itemToRemove = ModelData.shared.items[index]
        ModelData.shared.items.remove(at: index)

        DispatchQueue.main.asyncAfter(deadline: .now() + 2) {
        ModelData.shared.items.removeAll(where: { $0.id == itemToRemove.id })
        }

        print("Updated")
        }

        return .result()
    }
}
The provided code defines a structure called MyActionIntent, which conforms to the AppIntent protocol. This structure represents the intent to switch task states in the inventory application. Below is an explanation of its components:
title (static attribute): This attribute represents the title of the operation intention. It is of type LocalizedStringResource which is a localized string resource used for localization purposes.
id (attribute decorator): This attribute is decorated with @Parameter and represents the ID of the task that needs to be switched.
init(): This is the default initializer for structures. It does not perform any specific initialization.
init(id: String): This initializer allows you to create a MyActionIntent instance with a specific task ID.
Perform() (method): This method is required by the AppIntent protocol and performs Intent-related operations. Here’s a breakdown of its implementation: It checks the ModelData.shared.items array for a task that matches the ID provided in the intent.
If a match is found, it will toggle the task’s isAdded property using the toggle() method. This changes the status of the task. Then, it creates a local variable itemToRemove to store the switched task. Remove a task from the ModelData.shared.items array using the remove(at:) method and finding the index of the task. After a 2 second delay, itemToRemove is removed from the ModelData.shared.items array using removeAll(where:) and a closure that checks for a matching ID.
Finally, “Updated” is printed to the console. return .result(): This statement returns an IntentResult instance, indicating the completion of the intent without any specific result value. Overall, this code defines an intent that performs an action to toggle the status of tasks in the inventory. It accesses the shared instance of ModelData to find and modify tasks based on the provided ID.
Now it’s time to replace images with AppIntents
Button(intent: MyActionIntent(id: item.id)) {
    Image(systemName: item.isAdded ? "checkmark.circle.fill":"circle")
    .foregroundColor(.green)
    }
.buttonStyle(.plain)