
Preface
Relationship represents how one entity affects another entity, so it describes at least two entities. To configure the relationship, we need to provide the following content:
- name
- target entity
- delete rule
- Cardinality type (one-to-one, one-to-many, many-to-many)
- Whether to save relationships in storage
- Whether to allow optional when saving
- Every relationship must have an inverse relationship
Let’s take a look at how to use relationships.
Usage relationship
Suppose we have a requirement to store patients’ electronic medical records locally. We first define three entities: User (patient), Record (medical record) and Report (report picture). The relationship between the three is as follows:
- The same patient can have multiple medical records, so the relationship between User and Record is one-to-many. The name of the relationship is
records. The Xcode example is as follows: - The same medical record can only correspond to one patient, so the relationship between Record and User is one-to-one. The name of the relationship is
user, and the Xcode sample diagram is as follows:
- The same medical record can have multiple report results, so Record to Report are one-to-many. The name of the relationship is
reports, and the Xcode sample diagram is as follows:
- The same report can only correspond to one medical record, so Report is one-to-one to Record. The name of the relationship is
record, and the Xcode sample diagram is as follows:
Before writing the sample code, let us first introduce in detail the meaning of each parameter in the relationship inspector. The sample image of the official website inspector is as follows:
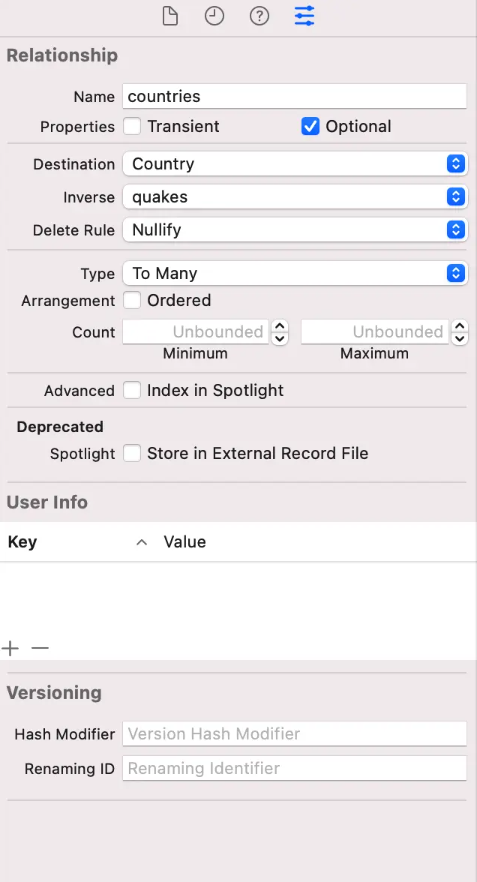
- Transient: Checking this option means that the relationship will not be saved to persistent storage. Therefore, Transient is useful for temporarily storing calculated or derived values. Core Data tracks changes to temporary property values for undo operations.
- Optional: Checking this option means that the relationship will be saved to persistent storage and the relationship must point to one or more instances of the target type. This option is checked by default when creating a relationship.
- Destination: Each relationship points from the source entity (the entity to which the relationship is added) to the destination entity. The destination entity is a related type that affects the source type and is affected by the source type.
- Inverse: When an instance of a source or target type changes, an inverse relationship enables Core Data to propagate changes in both directions. Every relationship must have an inverse relationship.
- Delete Rule: Core Data has the following four deletion rules:
- No Action: Only delete the source entity instance object and do not do any processing to the target entity object. This also means that you will not enjoy the convenience of automatic management brought by Core Data relationships. Developers need to handle the corresponding deletion logic themselves. The reference to the instance object will be retained, which may cause a null pointer problem, so be careful when using it.
- Nullify: Delete the source entity instance object, and the relationship on the object will be deleted. But the associated target entity object will not be deleted. For example, in the above-mentioned relationship between the patient and the patient’s multiple medical records, deleting one medical record will not cause the patient’s information to be deleted.
- Cascade: Delete deletes the source entity instance object and deletes the associated target entity object. For example, in the above-mentioned relationship between a patient and the patient’s medical record, if the patient is deleted, the patient’s medical record no longer needs to exist.
- Deny: If the associated object still exists, the deletion operation will be prevented. It is used to ensure that no null pointer problem occurs due to deleting an object.
- Cardinality Type: one-to-one, one-to-many. One-to-many can specify the upper and lower limits of the quantity.
- Index in Spotlight: Include this field in the Spotlight index.
After introducing the concept, let’s take a look at the sample code.
code example
func setupData() {
    let context = persistentContainer.viewContext
    let entity = NSEntityDescription.entity(forEntityName: userEntityName, in: context)

    let user = User(entity: entity!, insertInto: context)
    user.name = "name"

    let recordEntity = NSEntityDescription.entity(forEntityName: recordEntityName, in: context)
    let record = Record(entity: recordEntity!, insertInto: context)
    record.hospital = "hospital"
    record.date = Date()
    record.recordID = UUID()
    record.disease = "disease"
    record.medicalHistory = "medicalHistory"

    let record2 = Record(entity: recordEntity!, insertInto: context)
    record2.hospital = "hospital2"
    record2.date = Date()
    record2.recordID = UUID()
    record2.disease = "disease2"
    record2.medicalHistory = "medicalHistory2"

    let reportEntity = NSEntityDescription.entity(forEntityName: reportEntityName, in: context)
    let report = Report(entity: reportEntity!, insertInto: context)
    report.imageData = Data()
    record.addToReports(report)

    user.addToRecords([record, record2])
    save()
}
Code description: First, setupData()create the data that needs to be persisted in the function. Then add the initialized object to the corresponding entity object according to logic. It should be noted that: addToReports()/addToRecords()they are all codes automatically generated by XCode based on relationships. How to create automatically generated code can be found here .
After the above data is created, if it is deleted user, the associated , and under it will also be automatically deleted by Core Data according to recordthe record2relationship report.