MagicDrive main framework

MagicDrive is essentially based on the idea of the Bevgen model. By using Road Map, Object Box, Prompt and other content that are more suitable for autonomous driving as the input of the model, it is trained on the nuScenes data set. Therefore, it mainly includes two parts: encoding of model input (Road Map and the like) and modification of the model to meet: multi-view consistency and spatio-temporal consistency (more details will be introduced later). Next, let’s take a look at how the corresponding model works and is implemented.
Program structure
Let’s take a look at this file first pipeline_bev_controlnet.py. The comments made by the author here are also very detailed. Let’s analyze the specific content section by section.
The first is promptto correspond batch_size. For example, if we write two prompt:, {rainy, city} {sunny, rural road}it corresponds to two different scenarios, corresponding batch_size= 2. Putting them in the same batch can reuse the encoded Road Mapcontent without repeated calculations.
# 2. Define call parameters
# NOTE: we get batch_size first from prompt, then align with it.
if prompt is not None and isinstance(prompt, str):
    batch_size = 1
elif prompt is not None and isinstance(prompt, list):
    batch_size = len(prompt)
else:
    batch_size = prompt_embeds.shape[0]
The next step is to determine whether to perform cfgthe operation. Here we N_camhard-code it to 6, which corresponds to six different perspectives in the BEV perspective. This is followed by camera_paramencoding the addition parameters, whose purpose is to generate unconditional camera parameters (for specific encoding of the camera, please refer to the following content).
device = self._execution_device
do_classifier_free_guidance = guidance_scale > 1.0

### BEV, check camera_param ###
if camera_param is None:
    # use uncond_cam and disable classifier free guidance
    N_cam = 6  # TODO: hard-coded
    camera_param = self.controlnet.uncond_cam_param((batch_size, N_cam))
    do_classifier_free_guidance = False
### done ###
Here we encode the prompt. What is implemented here _encode_promptis the official library in diffusers. The encoder used isCLIP
# 3. Encode input prompt
# NOTE: here they use padding to 77, is this necessary?
prompt_embeds = self._encode_prompt(
    prompt,
    device,
    num_images_per_prompt,
    do_classifier_free_guidance,
    negative_prompt,
    prompt_embeds=prompt_embeds,
    negative_prompt_embeds=negative_prompt_embeds,
)  # (2 * b, 77 + 1, 768)
Here, the control images are converted to ensure that they are all in a unified format. This step corresponds to the conversion of Road Map
# 4. Prepare image
# NOTE: if image is not tensor, there will be several process.
assert not self.control_image_processor.config.do_normalize, "Your controlnet should not normalize the control image."
image = self.prepare_image(
    image=image,
    width=width,
    height=height,
    batch_size=batch_size * num_images_per_prompt,
    num_images_per_prompt=num_images_per_prompt,
    device=device,
    dtype=self.controlnet.dtype,
    do_classifier_free_guidance=do_classifier_free_guidance,
    guess_mode=guess_mode,
)  # (2 * b, c_26, 200, 200)
if use_zero_map_as_unconditional and do_classifier_free_guidance:
    # uncond in the front, cond in the tail
    _images = list(torch.chunk(image, 2))
    _images[0] = torch.zeros_like(_images[0])
    image = torch.cat(_images)
Then configure the corresponding ones timestepsand generate the initial latents required for denoising.
# 5. Prepare timesteps
self.scheduler.set_timesteps(num_inference_steps, device=device)
timesteps = self.scheduler.timesteps

# 6. Prepare latent variables
num_channels_latents = self.unet.config.in_channels
latents = self.prepare_latents(
    batch_size * num_images_per_prompt,
    num_channels_latents,
    height,
    width,
    prompt_embeds.dtype,
    device,
    generator,
    latents,  # will use if not None, otherwise will generate
)  # (b, c, h/8, w/8) -> (bs, 4, 28, 50)
Next, we encode the input of the model. In this step, we need to take a look at how prompt, camrea, object box and Road Map are encoded.
- First, the text prompt has been previously encoded as
prompt_embeds. - Subsequently for the camera information, previously encoded as
camera_param, - For the Road Map part, here is the corresponding one
image. - For
object boxencoding, the main thing is to useadd_uncond_to_kwargsthis function toobject boxput the information inbev_controlnet_kwargs. We will introduce the specific encoding methodadd_uncond_to_kwargsin detail later.
# 7. Prepare extra step kwargs.
extra_step_kwargs = self.prepare_extra_step_kwargs(generator, eta)

###### BEV: here we reconstruct each input format ######
assert camera_param.shape[0] == batch_size, \
    f"Except {batch_size} camera params, but you have bs={len(camera_param)}"
N_cam = camera_param.shape[1]
latents = torch.stack([latents] * N_cam, dim=1)  # bs, 6, 4, 28, 50
# prompt_embeds, no need for b, len, 768
# image, no need for b, c, 200, 200
camera_param = camera_param.to(self.device)
if do_classifier_free_guidance and not guess_mode:
    # uncond in the front, cond in the tail
    _images = list(torch.chunk(image, 2))
    kwargs_with_uncond = self.controlnet.add_uncond_to_kwargs(
        camera_param=camera_param,
        image=_images[0],  # 0 is for unconditional
        max_len=bbox_max_length,
        **bev_controlnet_kwargs,
    )
    kwargs_with_uncond.pop("max_len", None)  # some do not take this.
    camera_param = kwargs_with_uncond.pop("camera_param")
    _images[0] = kwargs_with_uncond.pop("image")
    image = torch.cat(_images)
    bev_controlnet_kwargs = move_to(kwargs_with_uncond, self.device)
###### BEV end ######
For the denoising process, the corresponding code is relatively long. Let’s take a look at the core content: first, use the code controlnetto encode all the information encoder_hidden_states_with_cam, then input the information into Unetit to get the predicted noise, and finally modify the letents. .
encoder_hidden_states_with_cam = self.(
    controlnet_latent_model_input,
    controlnet_t,
    camera_param,  # for BEV
    encoder_hidden_states=controlnet_prompt_embeds,
    controlnet_cond=image,
    conditioning_scale=controlnet_conditioning_scale,
    guess_mode=guess_mode,
    return_dict=False,
    **bev_controlnet_kwargs, # for BEV
)
for i, t in enumerate(timesteps):
    noise_pred = self.unet(
        latent_model_input,  # may with unconditional
        t,
        encoder_hidden_states=encoder_hidden_states_with_cam,
        **additional_param,  # if use original unet, it cannot take kwargs
        cross_attention_kwargs=cross_attention_kwargs,
        down_block_additional_residuals=down_block_res_samples,
        mid_block_additional_residual=mid_block_res_sample,
    ).sample

    latents = self.scheduler.step(
        noise_pred, t, latents, **extra_step_kwargs
    ).prev_sample
MagicDrive attention mechanism module
After understanding the overall model framework, let’s take a look at how they ensure consistency. The consistency here includes consistency from multiple perspectives (consistency from BEV’s six perspectives), as well as frame-to-frame in video generation. The consistency between them (that is, the corresponding spatio-temporal consistency), but the temporal consistency of the MagicDrive model here is relatively weak, and the object transformation in the video is still very obvious. We can refer to the methods in other papers to improve it.
Multi-view consistency
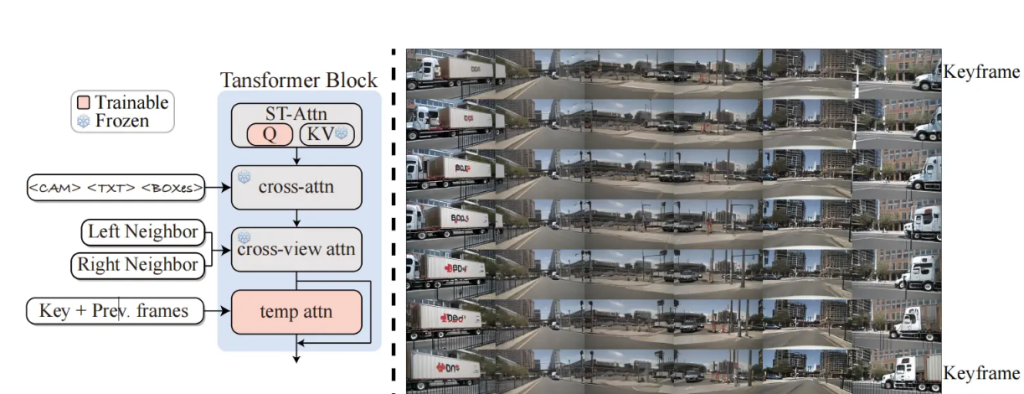
For multi-view consistency, we can intuitively think of using cross-attention to associate the images from the six views of BEV. Here MagicDrive implemented it and found that the best effect is to associate the left and right images when generating the image. The following is the corresponding announcement content:

The following is the corresponding program implementation. It can be observed that there are two processing neighbormethods, namely: addand contact, the author has tested two effects. Generally speaking, addthe effect will be better. There is another one here neighboring_view_pair, at the bottom of the code segment, which encodes the left and right neighbors of each position.
Then we saw two loops neighboring_view_pairfrom which adjacent hidden_states were fused using the “add” method. For example: key = 1, values = [0,2], hidden_states_in1two copies will be stored , and norm_hidden_states[:,1]the same hidden_states_in2will be stored . This achieves the fusion of left and right neighbor information.norm_hidden_states[:,0]norm_hidden_states[:,2]
def _construct_attn_input(self, norm_hidden_states):
    B = len(norm_hidden_states)
    # reshape, key for origin view, value for ref view
    hidden_states_in1 = []
    hidden_states_in2 = []
    cam_order = []
    if self.neighboring_attn_type == "add":
        for key, values in self.neighboring_view_pair.items():
            for value in values:
                hidden_states_in1.append(norm_hidden_states[:, key])
                hidden_states_in2.append(norm_hidden_states[:, value])
                cam_order += [key] * B
        # N*2*B, H*W, head*dim
        hidden_states_in1 = torch.cat(hidden_states_in1, dim=0)
        hidden_states_in2 = torch.cat(hidden_states_in2, dim=0)
        cam_order = torch.LongTensor(cam_order)
    elif self.neighboring_attn_type == "concat":
        for key, values in self.neighboring_view_pair.items():
            hidden_states_in1.append(norm_hidden_states[:, key])
            hidden_states_in2.append(torch.cat([
                norm_hidden_states[:, value] for value in values
            ], dim=1))
            cam_order += [key] * B
        # N*B, H*W, head*dim
        hidden_states_in1 = torch.cat(hidden_states_in1, dim=0)
        # N*B, 2*H*W, head*dim
        hidden_states_in2 = torch.cat(hidden_states_in2, dim=0)
        cam_order = torch.LongTensor(cam_order)

neighboring_view_pair:
  0: [5, 1]
  1: [0, 2]
  2: [1, 3]
  3: [2, 4]
  4: [3, 5]
  5: [4, 0]
After getting hidden_states_in1, hidden_states_in2, we input it into an attention module to complete this part of the calculation. self.attn4For ordinary Attention module
attn_raw_output = self.attn4(
    hidden_states_in1,
    encoder_hidden_states=hidden_states_in2,
    **cross_attention_kwargs,
)
spatiotemporal consistency
MagicDrive just tried it briefly, but the effect was not very good and the video picture was not stable enough.
First, look at the schematic diagram below. You can see that in order to generate an image from a perspective, we not only need information about the left and right perspectives, but also key frameinformation prev frameabout these two parts. This part is temp attnimplemented in the following ways. Next, let’s take a look at the specific procedures.

The method here is very consistent with the previous one, which is to extract the corresponding first frame as the key frame, extract the key value of the first frame and replace the key value of the subsequent images. There is a customized rearrange_3function to convert the corresponding shape.
key = attn.to_k(encoder_hidden_states)
value = attn.to_v(encoder_hidden_states)

# Sparse Attention
if not is_cross_attention:
    video_length = key.size()[0] // self.batch_size
    first_frame_index = [0] * video_length

    # rearrange keys to have batch and frames in the 1st and 2nd dims respectively
    key = rearrange_3(key, video_length)
    key = key[:, first_frame_index]
    # rearrange values to have batch and frames in the 1st and 2nd dims respectively
    value = rearrange_3(value, video_length)
    value = value[:, first_frame_index]

    # rearrange back to original shape
    key = rearrange_4(key)
    value = rearrange_4(value)

query = attn.head_to_batch_dim(query)
key = attn.head_to_batch_dim(key)
value = attn.head_to_batch_dim(value)

def rearrange_3(tensor, f):
    F, D, C = tensor.size()
    return torch.reshape(tensor, (F // f, f, D, C))
Improve content
There are several improvements, and the corresponding effects are much better, but they are not open source yet, so you can wait for their final effects.
encoding function
Introducing the encoding of object box and camera. Wait until later to complete it

