
About ffmpeg
Regarding ffmpeg, we first need to know what it is. The ffmpeg official website defines ffmpeg:
A cross-platform solution for audio and video recording/conversion/streaming.

Of course, it is introduced in more detail on the about page. It can be said that ffmpeg is an all-round operating framework for the audio and video field. In today’s Internet world, the operation and processing of audio and video will directly or indirectly rely on this framework (of course there are other audio and video frameworks).
How to use ffmpeg
There are two ways to use ffmpeg:
- Custom development and use
- Command line usage
Because ffmpeg’s audio and video processing capabilities are encapsulated in corresponding library files, we can embed the corresponding library files in our own code projects, and then call its basic capabilities to achieve what we want through various combinations Function, this is what custom development uses.
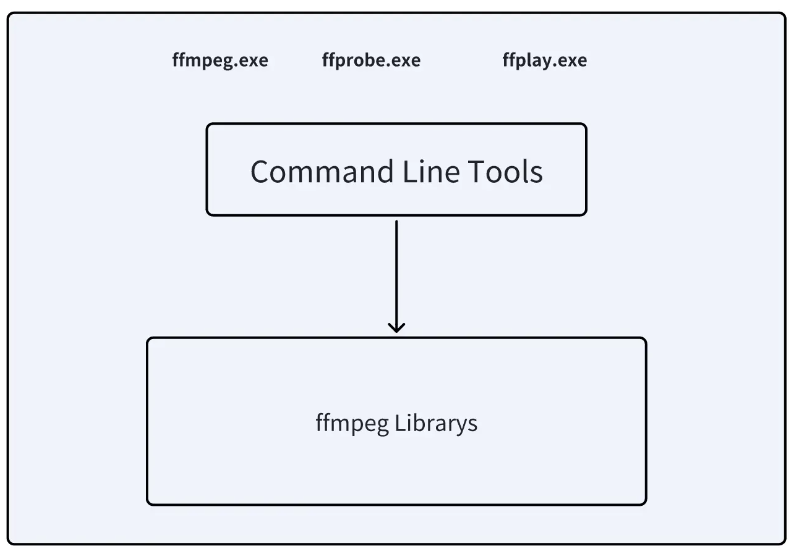
Moreover, ffmpeg itself will also package and package these function libraries into an executable file, which can accept various input commands. For example, on Windows, it is the ffmpeg.exe file. We can download this executable file and then command The line window executes the corresponding command line code.
Command Line
Let’s take the Windows platform as an example. Download the latest executable file from the official website . As expected, you will download three executable files, namely:
- ffmpeg, used for the ability to modify (record, capture, crop, convert, etc.) audio and video processing
- ffprobe, used to analyze relevant information of audio and video files
- ffplay, play audio and video
Add the path of the file to the system path to call it in the command line window.
For example, view some information about media files
ffprobe -show_streams sample.mp4 //
For example, video file format conversion
//
ffmpeg -i sample.mp4 -c copy output.avi
There are many command line parameters and combinations. For details, please refer to the official website Command Line Tools Documentation .
You can also take a look at Ruan Yifeng’s FFmpeg video processing introductory tutorial first . I think his tutorials are very detailed and easy to understand.
Custom development
Custom development puts aside the shell of ffmpeg, only obtains the library files for its internal functions, integrates the library files into our project, and implements our own functions by calling the API provided by ffmpeg. This will involve c/cpp development.
I won’t give more details about custom development. This is not the focus of this article, and function development will be carried out specifically on the basis of ffmpeg later.
summary
Relatively speaking, the command line method is simpler, because the command line is equivalent to encapsulating some logic codes for function implementation in advance. The use of custom development is much more complicated, because custom development requires you to implement the logic yourself. However, custom development is more flexible and more suitable for those with refined and highly customized needs, and it is easier for us to understand some of the processes of audio and video processing.
In fact, there is no essential difference between the two usage methods. The command line adds an intermediate layer on top of the library, condensing some functions into several command parameters to simplify development. For customization, you directly remove the middle layer and directly contact the library.
ffmpeg function module
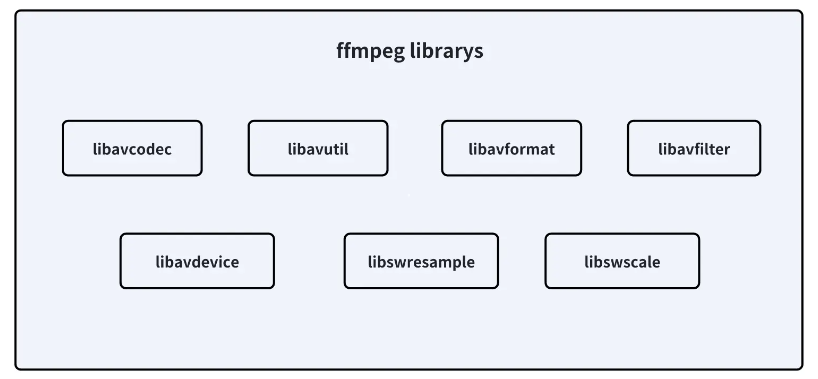
libavcodecProvide audio and video encoding and decoding capabilitieslibavformatProvides the ability to handle various audio and video container formats, such as encapsulation and decapsulationlibavutilProvide some practical functionslibavfilterProvide filter effects for audio and video streamslibavdeviceProvides the ability to operate input and output devices. For example, getting video data from the camera and outputting the video data to the screenlibswresampleImplement audio mixing and resampling capabilitieslibswscaleImplement color conversion and scaling capabilities of video frames
If you use the command line mode, all the above libraries will generally be packaged, and if it is custom development, they will be used on demand. For example, if it does not involve device operation, you can not need libavdevice, and if you do not need the filter function, you can not need libavfilter…
These support libraries are cross-platform and can be either dynamic libraries or static libraries.
Some basic concepts of ffmpeg
time_scale
time_scale can be called time scale, and its specific meaning is
time_scale = 10 //

time_scale = 1000 //
time_base
Time_base is a very important concept in ffmpeg. It is generally called the time base, or it can be said to be the basic unit of time in ffmpeg.
The basic unit of time used in the real world is generally seconds, because seconds are accurate enough for ordinary people, and there is no need to use milliseconds or microseconds. However, in ffmpeg, seconds are not used as the basic unit, but seconds are divided into minutes. For several parts, one part is used as the basic unit of time in ffmpeg.
time_base = 1/24   //

time_base = 1/1000   //
A large number of time representations in ffmpeg (AVStram, AVPacket, PTS, DTS in AVFrame) all use time_base as the basic unit, not real time.
PTS/DTS/pts_time
- DTS (Decoding Time Stamp, decoding timestamp)
- Indicates at what point in time the decoder should start decoding the frame (decoding order)
- PTS (Presentation Time Stamp, display timestamp)
- Indicates at what point in time the frame should be presented to the user. PTS is a timestamp determined after decoding and used in the rendering or playback order of video frames or audio frames.
- pts_time
- The display time of the current media frame, in seconds
DTS and PTS are generally based on time_base.
About the calculation method between pts, pts_time, time_base
time_base = 1/75;
 Frame        pts           pts_time
   0          0          0 x 1/75 = 0.00
   1          3          3 x 1/75 = 0.04
   2          6          6 x 1/75 = 0.08
   3          9          9 x 1/75 = 0.12
AVStream
In ffmpeg, when reading or writing a video file, a data structure AVFormatContext is built internally. This structure contains video-related information. One of the information is the AVStram array. Each AVStream contains a kind of data, such as audio. and video respectively represent an AVStram structure, from which we can obtain such things as duration, number of frames, codec information, time_base, etc.
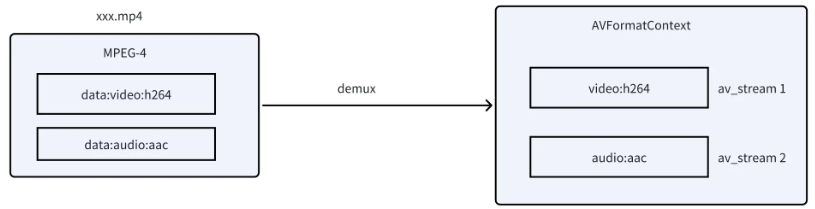
Once we obtain the AVStream, we can read the data represented by the Stream.
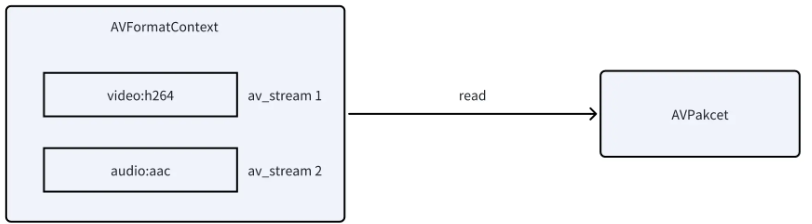
AVPacket
In ffmpeg, after reading the basic information of the video file, the formal data content can be read for decoding, and the data format used for decoding is AVPacket.
AVPakcet internally includes data to be decoded, size, pts, dts, time_base, stream_id (indicating which AVStream the packet is read from), etc.
AVFrame
AVFrame is the decoded original data, representing a frame that can be used. Note that this is not necessarily a video frame, it may also be an audio frame, because both video and audio use the AVFrame data structure.
AVFrame contains playable data, width, height (video), frame type (video), number of samples (audio), audio format, PTS, etc.
Generally, if it is video, AVFrame represents YUV or RGB images; if it is audio, AVFrame represents PCM data.

The data obtained at this time can be played directly.
Audio and video synchronization
After obtaining the available audio or video frames, it is not just sent directly to the corresponding device for playback. Generally, we need to perform audio and video synchronization control, because there will be various differences in the speed of obtaining available frames between audio and video. The difference is huge. For example, the video plays quickly, but the audio only plays a little. Therefore, we need to control the playback speed of each frame through PTS and time_base.
As for the synchronization method, it is generally necessary to establish a time coordinate system as a reference, and then calculate whether the display timestamp of each frame corresponds to the correct time, otherwise, wait.
Logical flow and data format conversion
Based on the above brief introduction to some data types, we can already get a logical flow of the audio file playback process.

Similarly, saving the playable raw data into a file is the reverse of this process, which is much the same.
Summarize
This article mainly introduces the usage of ffmpeg, core modules, and some basic concepts in ffmpeg. Later, from the perspective of custom development, we will analyze the details of ffmpeg’s data structure and the complete process of playing a video. Finally, I will talk about how to use it on the Android platform.