

Preface
In this article, we will delve into the entire process of building a front-end tool function library that chatgptis essential in the business with the help of . jsWith the help of artificial intelligence, we will subvert the traditional development method, explore AIa new working model of front-end engineers in the era, and provide more efficient and intelligent solutions for business development.
demand analysis
An excellent jstool library should at least include the following aspects:
1. For users
- Clear usage documentation (vitepress)
- Sane type hints (typescript)
- Complete unit testing (jest)
2. For developers
- eslint
- pritter
- commitlint
- ci/cd
Before development
In the traditional model, when we develop, we will first consult the documentation and create the project step by step according to the documentation, install dependencies, configure various rules, handwrite specific functions, handwrite unit tests, etc.
In the era of AI, we try to describe our needs chatgptto let it write code for us.
Before starting, you usually need to chatgptset up a role, for example:
You are a senior front-end expert, and I am a front-end novice. Please help me solve the questions I raised in the following conversation. You need to answer step by step.
This can improve chatgptthe accuracy of answers
Create project
Send the following to chatgpt
Please tell me how to create a typescript version of the vitepress project and configure eslint, prettier, husky, and commlitlint. Please tell me the specific implementation steps step by step.
chatgptConfigure according to the answer
Step 1: Create vitepress project
mkdir one-js-helper
cd one-js-helper
npm init vitepress
Step 2: Install dependencies
pnpm add -D eslint prettier husky lint-staged @commitlint/cli @commitlint/config-conventional
Step 3: Configure tsconfig.json
{
  "compilerOptions": {
    "target": "esnext",
    "module": "esnext",
    "moduleResolution": "node",
    "strict": true,
    "jsx": "preserve",
    "esModuleInterop": true,
    "skipLibCheck": true,
    "forceConsistentCasingInFileNames": true,
    "declaration": true,
    "outDir": "./dist",
    "declarationMap": true,
    "sourceMap": true,
  },
  "include": ["src"],
  "exclude": ["node_modules", "dist"]
}
Step 4: Configure eslint (newly created in the root directory .eslintrc.cjs)
module.exports = {
  extends: [
    'eslint:recommended',
    'plugin:@typescript-eslint/recommended',
  ],
  plugins: ['@typescript-eslint'],
  parserOptions: {
    parser: '@typescript-eslint/parser',
    ecmaVersion: 2020,
    sourceType: 'module'
  },
  rules: {
    '@typescript-eslint/ban-ts-comment': 'off',
    quotes: ['error', 'single'],
    semi: ['warn', 'always'],
    'no-console': ['warn', { allow: ['warn', 'error'] }],
    '@typescript-eslint/no-unused-vars': 'warn',
    'prefer-const': 'error',
    eqeqeq: 'error',
    '@typescript-eslint/ban-types': [
      'error',
      {
        extendDefaults: true,
        types: {
          Function: false,
        },
      },
    ],
  },
};
Step 5: Configure prettier (newly created in the root directory .prettierrc.cjs)
module.exports = {
  printWidth: 80,
  tabWidth: 2,
  semi: true,
  singleQuote: true,
  trailingComma: 'all',
  bracketSpacing: true,
  jsxBracketSameLine: true,
  arrowParens: 'avoid',
  requirePragma: false,
  proseWrap: 'preserve',
};
Step 6: Configure husky and lint-staged
Add the following content in package.json:
"lint-staged": {
    "*.{ts,js}": [
      "eslint --fix",
      "prettier --write"
    ],
    "*.md": [
      "prettier --write"
    ],
    "*.test.ts": [
      "jest --passWithNoTests"
    ]
}
Then execute it and add the following 2 files in the npx husky installnewly created folder:.husky
commit-msg
#!/usr/bin/env sh
. "$(dirname -- "$0")/_/husky.sh"

npx --no -- commitlint --edit $1
pre-commit
#!/usr/bin/env sh
. "$(dirname -- "$0")/_/husky.sh"

npx lint-staged
Step 7: Configure commitlint (newly created in the root directory commitlint.config.cjs)
module.exports = {
  extends: ['@commitlint/config-conventional']
};
Officially developed
After the above steps, the configuration has been basically completed. Now you can enter the specific function implementation. Here is an example of implementing an email verification function.
Enter the following intochatgpt
Please help me implement a function to verify email address
1. Required to be implemented using ts
2. To have unit tests that include all cases, use jest
chatgptStart coding based on the answer
Step 1: Install dependencies
pnpm add -D typescript jest ts-jest @types/jest
Step 2: Implement the verification function (new src/validate.ts)
export function validateEmail(email: string): boolean {
  //
  const emailRegex = /^[^\s@]+@[^\s@]+\.[^\s@]+$/;
  return emailRegex.test(email);
}
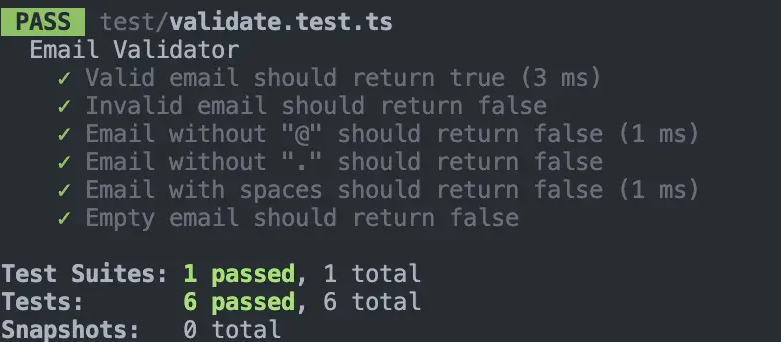
Step 3: Unit Test (New test/validate.test.ts)
import { validateEmail } from '../validateEmail';

describe('Email Validator', () => {
  test('Valid email should return true', () => {
    expect(validateEmail('[email protected]')).toBe(true);
  });

  test('Invalid email should return false', () => {
    expect(validateEmail('invalid_email')).toBe(false);
  });

  test('Email without "@" should return false', () => {
    expect(validateEmail('testexample.com')).toBe(false);
  });

  test('Email without "." should return false', () => {
    expect(validateEmail('test@examplecom')).toBe(false);
  });

  test('Email with spaces should return false', () => {
    expect(validateEmail('test @example.com')).toBe(false);
  });

  test('Empty email should return false', () => {
    expect(validateEmail('')).toBe(false);
  });
});
Step 4: Set up shortcut commands ( package.jsonnew in Medium)
{
  "scripts": {
    "test": "jest"
  }
}
Step 5: Add in the root directoryjest.config.ts
module.exports = {
  preset: 'ts-jest'
};
Then execute pnpm testand view the results
For subsequent tool functions, just follow the above method and repeat it.
Pack
package.jsonAdd the following content to
"files": [
  "dist",
  "README.md"
],
{
  "scripts": {
    "bundle:build": "rollup -c",
  }
}
Send the following tochatgpt
I want to package the above code (using rollup) and build it. I need to support both esModule and commonjs. Please tell me step by step how to do it.
chagptConfigure based on the answer
Step 1: Install dependencies
pnpm add -D rollup @rollup/plugin-typescript rollup-plugin-terser tslib
Step 2: Add in the root directoryrollup.config.js
import typescript from '@rollup/plugin-typescript';
import { terser } from 'rollup-plugin-terser';

export default {
  input: 'src/index.ts', //
  output: [
    {
      file: 'dist/bundle.esm.js',
      format: 'es',
      sourcemap: true,
    },
    {
      file: 'dist/bundle.cjs.js',
      format: 'cjs',
      sourcemap: true,
    },
  ],
  plugins: [
    typescript(), //
    terser(), //
  ],
  external: [], //
};
Step 3: package.jsonAdd the following content
"main": "dist/bundle.cjs.js",
"module": "dist/bundle.esm.js",
"types": "dist/index.d.ts",
"scripts": {
    "bundle:build": "rollup -c"
}
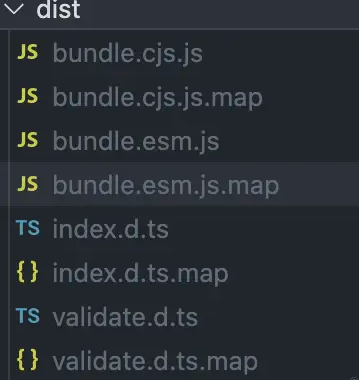
Then execute pnpm bundle:buildand view the packaging results
deploy
Deploy documents togithub page
Create a new one .github/workflows/deploy.ymland write the following content. Just copy the vitepress deployment content here.
name: Deploy VitePress site to Pages

on:
  push:
    branches: [main]

  workflow_dispatch:

permissions:
  contents: read
  pages: write
  id-token: write

concurrency:
  group: pages
  cancel-in-progress: false

jobs:
  build:
    runs-on: ubuntu-latest
    steps:
      - name: Checkout
        uses: actions/checkout@v4
        with:
          fetch-depth: 0
      - uses: pnpm/action-setup@v2
        with:
          version: 8
      - name: Setup Node
        uses: actions/setup-node@v4
        with:
          node-version: 20
          cache: pnpm
      - name: Setup Pages
        uses: actions/configure-pages@v4
      - name: Install dependencies
        run: pnpm install
      - name: Build with VitePress
        run: |
          pnpm docs:build
          touch docs/.vitepress/dist/.nojekyll
      - name: Upload artifact
        uses: actions/upload-pages-artifact@v3
        with:
          path: docs/.vitepress/dist

  deploy:
    environment:
      name: github-pages
      url: ${{ steps.deployment.outputs.page_url }}
    needs: build
    runs-on: ubuntu-latest
    name: Deploy
    steps:
      - name: Deploy to GitHub Pages
        id: deployment
        uses: actions/deploy-pages@v4
Post tonpm
package.jsonAdd the following content to
"scripts": {
   "bundle:publish": "npm publish --registry https://registry.npmjs.org"
}
Send the following tochatgpt
How to
rolluppublish the above packaged files tonpmand automatically update the new version.github/workflows/publish.yml, write the following content
chatgptConfigure according to the answer
Create a new one .github/workflows/publish.ymland write the following content:
name: Node.js Package

on:
  release:
    types: [created]
  push:
    branches: [main]

jobs:
  build:
    runs-on: ubuntu-latest
    steps:
      - uses: actions/checkout@v3
      - name: Setup Node.js and pnpm
        uses: actions/setup-node@v3
        with:
          node-version: 20
      - run: npm install -g pnpm
      - run: pnpm install

  publish:
    needs: build
    runs-on: ubuntu-latest
    steps:
      - uses: actions/checkout@v3
      - name: Setup Node.js and pnpm
        uses: actions/setup-node@v3
        with:
          node-version: 20
          registry-url: https://registry.npmjs.org/
      - run: npm install -g pnpm
      - run: pnpm install
      - name: configuration Git
        run: |
          git config --global user.email "you git email" #
          git config --global user.name "you git usename" #
      - name: Bump version and push to Git
        run: |
          npm version patch -m "ci: release version to %s [skip ci]"
          git push origin main
      - run: pnpm publish
        env:
          NODE_AUTH_TOKEN: ${{secrets.NPM_AUTH_TOKEN}}
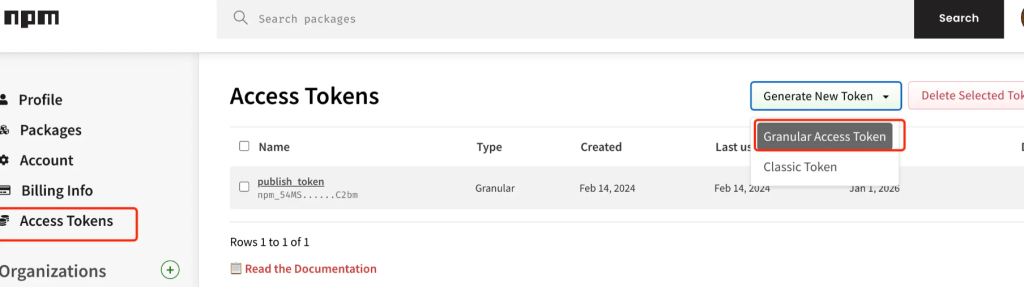
The NPM_AUTH_TOKENconfiguration process is as follows:
Step 1: Log in npmand createtoken
Then go to the project warehouse, enter Settingsthe page, and add the newly created one npm tokento the place shown in the picture below.
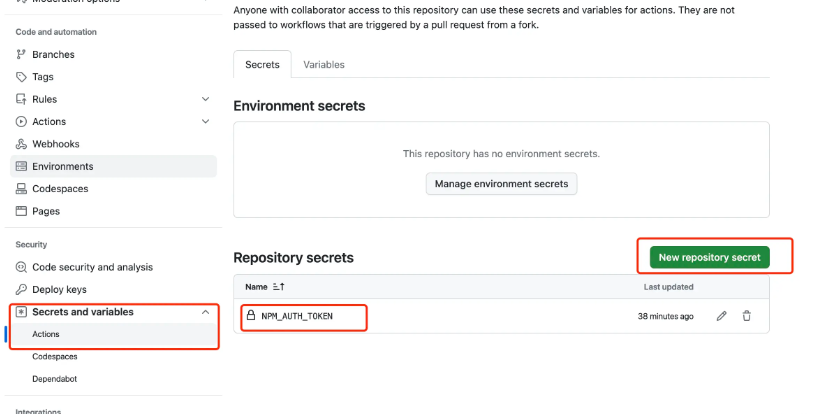
After the configuration is completed, when the code is submitted to mainthe branch, it will be automatically published to npmand the documents deployed togithub page
Summarize
The above is jsthe entire content of the tool function library. Each of the above steps is chatgptcompleted with the help of. now we only need to chatgptsubmit our requirements to the specific code, all by chatgpttell us
In addition, although the implementation process of the above article seems to be very smooth, there are also some problems encountered during the implementation process. Some problems chatgptcan be solved directly by providing the error and context. Some errors still need to be solved by google. But overall, , still saves a lot of time than the traditional implementation method.