

In current inspection projects, an efficient and accurate algorithm is needed to process large amounts of image data. After some research and comparison, YOLOv5 was initially selected as the algorithm tool. YOLOv5 is a deep learning-based detection algorithm known for its speed and accuracy. It not only processes image data quickly, but also provides high detection accuracy.
- Project address: github.com/ultralytics…
- Project documentation: docs.ultralytics.com/yolov5/tuto…
Configuration Environment
Environment preparation: Before conducting YOLOv5 training and prediction, we need to ensure that the environment is ready. Here are the specific steps:
- Create a virtual environment : Use conda to create a new virtual environment and name it yolov5.
conda create -n yolov5 python=3.8 - Activate the virtual environment : Activate the yolov5 virtual environment just created.
conda activate yolov5 - Install dependency packages : Install the necessary dependency packages. Here we take the GPU environment as an example.
pip install ultralytics - Clone the YOLOv5 project : Clone the YOLOv5 project from GitHub.
git clone https://github.com/ultralytics/yolov5 - Enter the project directory : Enter the cloned YOLOv5 project directory.
cd yolov5 - Install project dependencies : Install dependency packages in the project.
pip install -r requirements.txtNote:requirements.txtThe troch version in needs to match your hardware resources and CUDA version. If there is a mismatch, the GPU may not be started for training.
Through the above steps, we ensure that the environment is ready for smooth training and prediction of YOLOv5. Next, we will introduce how to conduct training.
train
You can easily start training using official data or data annotated in coco format. If it is self-labeled data, the data format is:
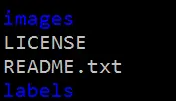
images:Put original pictures in the folder;labels: Put the marked label files in the folder;
Training is the core part of the deep learning model, which determines the performance and accuracy of the model. YOLOv5 provides powerful training functions, allowing users to customize according to their own needs. Here is a basic training command example, and what each parameter means:
python train.py --data coco.yaml --epochs 300 --weights '' --cfg yolov5n.yaml --batch-size 128
-–data coco.yaml: Specify the configuration file of the training data set.-–epochs 300: Set the number of training rounds (epoch).-–weights: Specify the weights of the pre-trained model. If an empty string is used, the pre-trained weights will not be loaded.-–cfg yolov5n.yaml: Specify the configuration file to define the structure and training parameters of the model.-–batch-size 128: Set the number of images processed per iteration
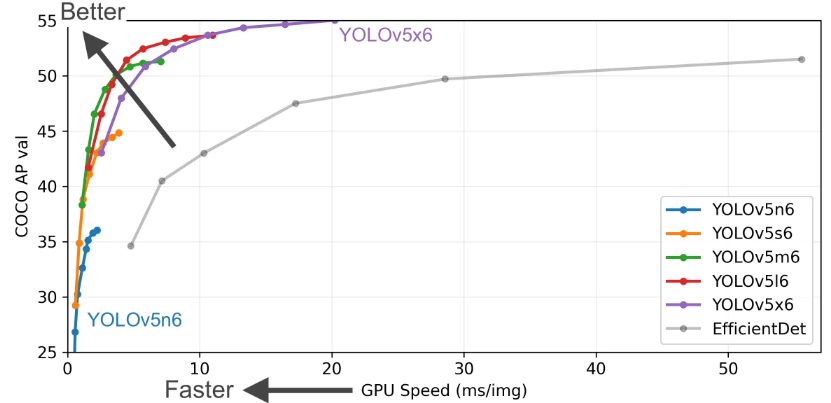
The above command can reproduce the effect of YOLOv5 COCO. Models and datasets will be automatically downloaded from the latest version of YOLOv5. On the V100 GPU, the model is optional YOLOv5n/s/m/l/x, and the corresponding training time is 1/2/4/6/8 days respectively (training using multiple GPUs will be faster). Use as large a –batch-size value as possible (16, 32, 64, 128), or pass –batch-size -1 to enable YOLOv5’s automatic batch processing feature. Batch sizes shown are for V100-16GB GPU. You can also add pre-trained models and multiple GPUs during training--weights ./pre-models/yolov5m.pt --device 0,1
The optional pre-training models are shown in the table below. Choose the model that suits you according to accuracy and inference time:
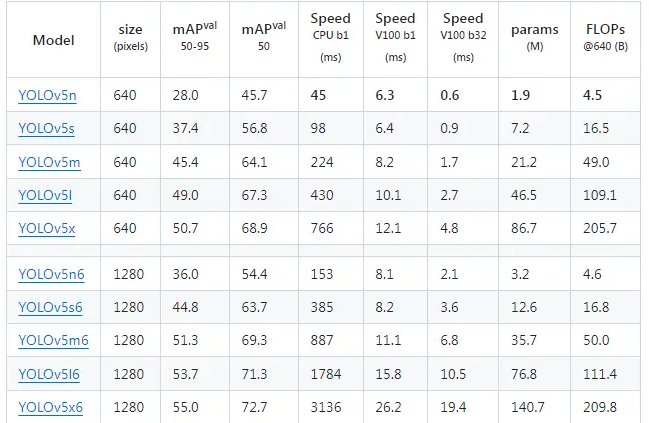
- All checkpoints were trained for 300 epochs with default settings.
- The Nano and Small models use the hyperparameter configuration of hyp.scratch-low.yaml, while the other models use hyp.scratch-high.yaml.
- The mAPval value refers to the evaluation result of a single model and a single scale on the COCO val2017 data set. This result can be reproduced with the following command:
python val.py --data coco.yaml --img 640 --conf 0.001 --iou 0.65 - Speed is measured averaged over the COCO val image set on an AWS p3.2xlarge instance. NMS time (approximately 1 ms per image) is not included. Use the following command to reproduce the speed test:
python val.py --data coco.yaml --img 640 --task speed --batch 1 - TTA (Test Time Augmentation) includes reflection and scale enhancement. TTA can be reproduced with the following command:
python val.py --data coco.yaml --img 1536 --iou 0.7 --augment
predict
Prediction is the ultimate goal of deep learning models, which applies the trained model to actual data to achieve target detection. YOLOv5 provides a convenient prediction function that can quickly perform target detection on images or videos.
Use files already in the project detect.pyfor forecasting
detect.pyInference tasks can be performed on a variety of sources. It will automatically download the required model from the latest YOLOv5 version or use an already trained model, and save the inference results to the runs/detect folder.
python detect.py --weights yolov5s.pt --source img.jpg # image
weights: Specify the weight file of the model. The pre-trained yolov5s model is used here. If it is available locally, it will not be downloaded. If not, it will be downloaded online;source: In addition to images, YOLOv5 also supports multiple input sources, including videos, webcams, screenshots, etc. You can choose the appropriate input source according to your needs.0: #webcamimg.jpg#imagevid.mp4#videoscreen# screenshotpath/# directorylist.txt# list of imageslist.streams# list of streams'path/*.jpg'#glob'https://youtu.be/LNwODJXcvt4'# Youtube'rtsp://example.com/media.mp4'# RTSP, RTMP, HTTP stream
Use torch.hubfor prediction
YOLOv5 PyTorch Hub provides automated inference services. The required models will be automatically downloaded from the latest YOLOv5 version.
import torch

# Model
model = torch.hub.load("ultralytics/yolov5", "yolov5s")  # or yolov5n - yolov5x6, custom

# Images
img = "https://ultralytics.com/images/zidane.jpg"  # or file, Path, PIL, OpenCV, numpy, list

# Inference
results = model(img)

# Results
results.print()  # or .show(), .save(), .crop(), .pandas(), etc.
The above content is to download the model from the Internet and perform inference. If you want to use your own model for inference, it is encapsulated here. The code is as follows:
import os
import sys
import json
import torch
import numpy as np


CURRENT_DIR = os.path.abspath(os.path.dirname(__file__)) + '/'


class Detector:
    """implement detector
    """
    def __init__(self):
        # load model
        self.model = torch.hub.load(
            os.path.join(CURRENT_DIR, './'), 'custom',
            path=os.path.join(CURRENT_DIR, './yolov5s.pt'),
            source='local', device='cpu')

    def detect_img(self, img_file):
        """
        detect from input

        Args:
            file, Path, PIL, OpenCV, numpy, list
        """
        # inference
        results = self.model(img_file)
        crops = results.crop(save=False)  # cropped detections dictionary
        return crops


if __name__ == '__main__':
    dt = Detector()
    img = sys.argv[1]
    detect_res = dt.detect_img(img)
    print(detect_res)
It is used here results.cropbecause it will return more information. The returned results include predicted labels, confidence levels, and detection areas, etc., which facilitates subsequent business logic processing.
in conclusion
The YOLO series algorithm is a very practical tool project in the detection algorithm and can be well used in the industry. This article introduces the training and prediction process of Yolov5, which is convenient for everyone to use and review later.