

The OKT507-C development board designed and developed based on the Allwinner T507H processor will be introduced as an example.
Forlinx Desktop (Ubuntu) system is based on Ubuntu’s official operating system for embedded devices – Lubuntu. This operating system has common commands such as apt-get and ldd. If you need to install software, you can directly install it online with apt-get. No need Perform tedious operations such as cross-compilation and transplantation. However, every time the image is re-burned, the previously installed software must be reinstalled, which is relatively cumbersome. If batch operations are required, each development board needs to be installed with apt-get, which will greatly increase the workload and is inconvenient for batch operations. Production.
Can the software be packaged into the image together? In this way, you don’t have to go to apt-get to install it online every time after programming. The answer is of course yes, this involves the customization of the file system, so next, the editor will introduce to you the operation process of customizing the file system on the Forlinx Desktop (Ubuntu) system.
- Unzip the file system
First, find the directory where the file system of the OKT507-desktop-release source code is located, and then decompress the file system compressed package. The path is as follows:
OKT507-desktop-release/ubuntu

After decompression, you can see the file system directory OKT507-linux-ubuntu. After entering this directory, you can see the following folders:

- Install QEMU
Here is a brief introduction to QEMU. It is a compact simulator that can simulate many hardware such as ARM, x86, AMD64/Intel64, etc. QEMU is widely used, such as Xen, Android emulator, etc. are all based on QEMU. Next we start to install QEMU on the virtual machine, as follows:
① Update download source:
sudo apt-get update
②Execute the command to install:
sudo apt-get install qemu-aarch64-static
sudo apt-get install qemu-user-static
- Change setting
① Copy QEMU’s qemu-arm-static to the file system directory OKT507-linux-ubuntu, as follows:
sudo cp /usr/bin/qemu-arm-static usr/bin/

② Copy the DNS configuration on the PC host side, because we will need to use the network when installing the program later:
sudo cp -b /etc/resolv.conf etc/resolv.conf

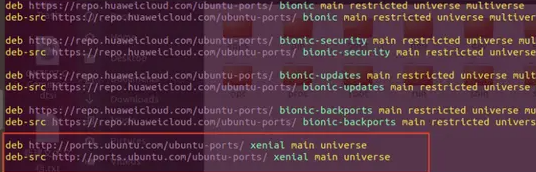
③ Modify download source:
sudo vim etc/apt/sources.list
Add to
deb ports.ubuntu.com/ubuntu-port… xenial main universe deb-src ports.ubuntu.com/ubuntu-port… xenial main universe
- Mount file system
Because we are mounting and unmounting the file system through scripts, we need to write a script to mount and unmount the file system.
① Create a new script file named ch-mount.sh, with the following code:
#!/bin/bash function mnt() { echo “MOUNTING” sudo mount -t proc /proc **{2}proc sudo mount -t sysfs /sys **{2}sys sudo mount -o bind /dev ** {2}dev sudo chroot {2} } function umnt() { echo “UNMOUNTING” sudo umount {2}proc sudo umount{2}sys sudo umount {2}dev } if [ ” 1″ == “-m” ] && [ -n ” 2″ ] ; then mnt 11 2 elif [ “1” == “-u” ] && [ -n “2” ]; then umnt 11 2 else echo “” echo “Either 1’st, 2’nd or both parameters were missing” echo “” echo “1’st parameter can be one of these: -m(mount) OR -u(umount)” echo “2’nd parameter is the full path of rootfs directory(with trailing ‘/’)” echo “” echo “For example: ch-mount -m /media/sdcard/” echo “” echo 1st parameter : **{1 } echo 2nd parameter: ${2} fi
② Set the executable permissions of this shell script as follows:
sudo chmod 777 ch-mount.sh
③ Mount the file system:
Execute the ch-mount.sh script and specify the parameter -m. The successful mounting is as follows:
sudo ./ch-mount.sh -m ./

- install software
We mounted the file system earlier and mounted the file system to the QEMU simulator. Next, we can install the software we need.
① Update download source:
apt update
Note: Updating the download source may result in an error. Please note that because the tmp folder does not have enough permissions, chmod gives it permissions.
as follows:
chmod 777 /tmp
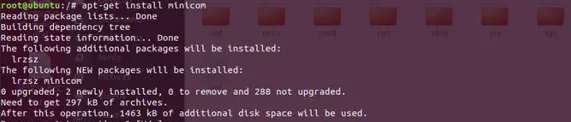
② Install software:
At this point, you can install the required software. Here, use apt-get to install the software you need, and install it according to your needs. Let’s install a minicom serial port test tool here. as follows:
③ After the installation is complete, exit to exit QEMU.
④ Execute the ch-mount.sh script to unmount the file system, specify the parameter -u, and print the following after the uninstall is successful:

Note: After we exit, we only exit the QEMU emulator and do not uninstall the file system. We must execute the script to uninstall the file system.
- Packaging file system
① After completing the previous steps, use the tar command to compress all files in the current folder and name them OKT507-linux-ubuntu.tar.gz. as follows:
sudo tar -cvzf OKT507-linux-ubuntu.tar.gz ./*
② After the compression is completed, grant permissions to the file system compression package OKT507-linux-ubuntu.tar.gz, as follows:
sudo chmod a+w OKT507-linux-ubuntu.tar.gz

③ Replace the newly packaged compressed package with the old file system compressed package in the upper-level directory.

④ Recompile and package to generate a new image for burning the development board.

- Test Methods
After burning it to the board, start minicom in the terminal and verify whether it is installed. as follows:
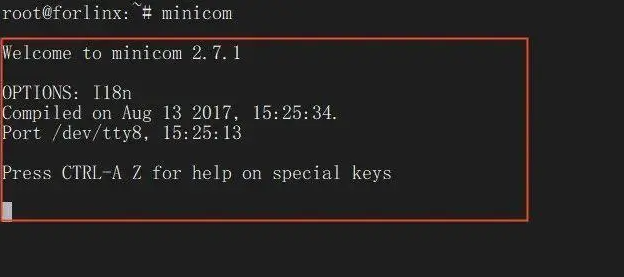
As you can see from the red box in the picture above, minicom is started through the terminal command, which means that we have successfully installed it in QEMU. At this point, the Ubuntu file system customization is completed.
Through this method, you can customize your own file system and install the software you need. You can also uninstall software that is not required by the factory in the same way according to your own needs. This can not only reduce the workload, but also facilitate mass production. .